Subscribe:

Enter your email address:

Delivered by FeedBurner

Previous Posts

Categories

Site search


MUSHROOMS PERSILLADE

blog-duxelles2

The French technique of adding freshly chopped parsley and garlic to a dish, usually at the end of cooking, is called persillade (“pers-ee-yahd”), which sounds difficult, but couldn’t be easier. In fact, it’s a great example of how two basic, inexpensive supermarket ingredients can impart resonant flavor to a dish.

It’s reason alone, in my opinion, to order escargots à la bourguignonne when the opportunity presents itself, although I draw the line at cuisses de grenouilles en persillade, aka frog’s legs—not because I’m squeamish, but because frogs are being eaten to extinction. (As if climate change and disease weren’t enough to deal with!) I’m too unambitious to attempt fried chicken persillade, a signature dish of the late great New Orleans chef Austin Leslie—at least not until we decide it’s time to repaint the kitchen—so I pretty much confine my persillading to smalltime stuff such as sautéed potatoes, tomatoes, and, especially, mushrooms.

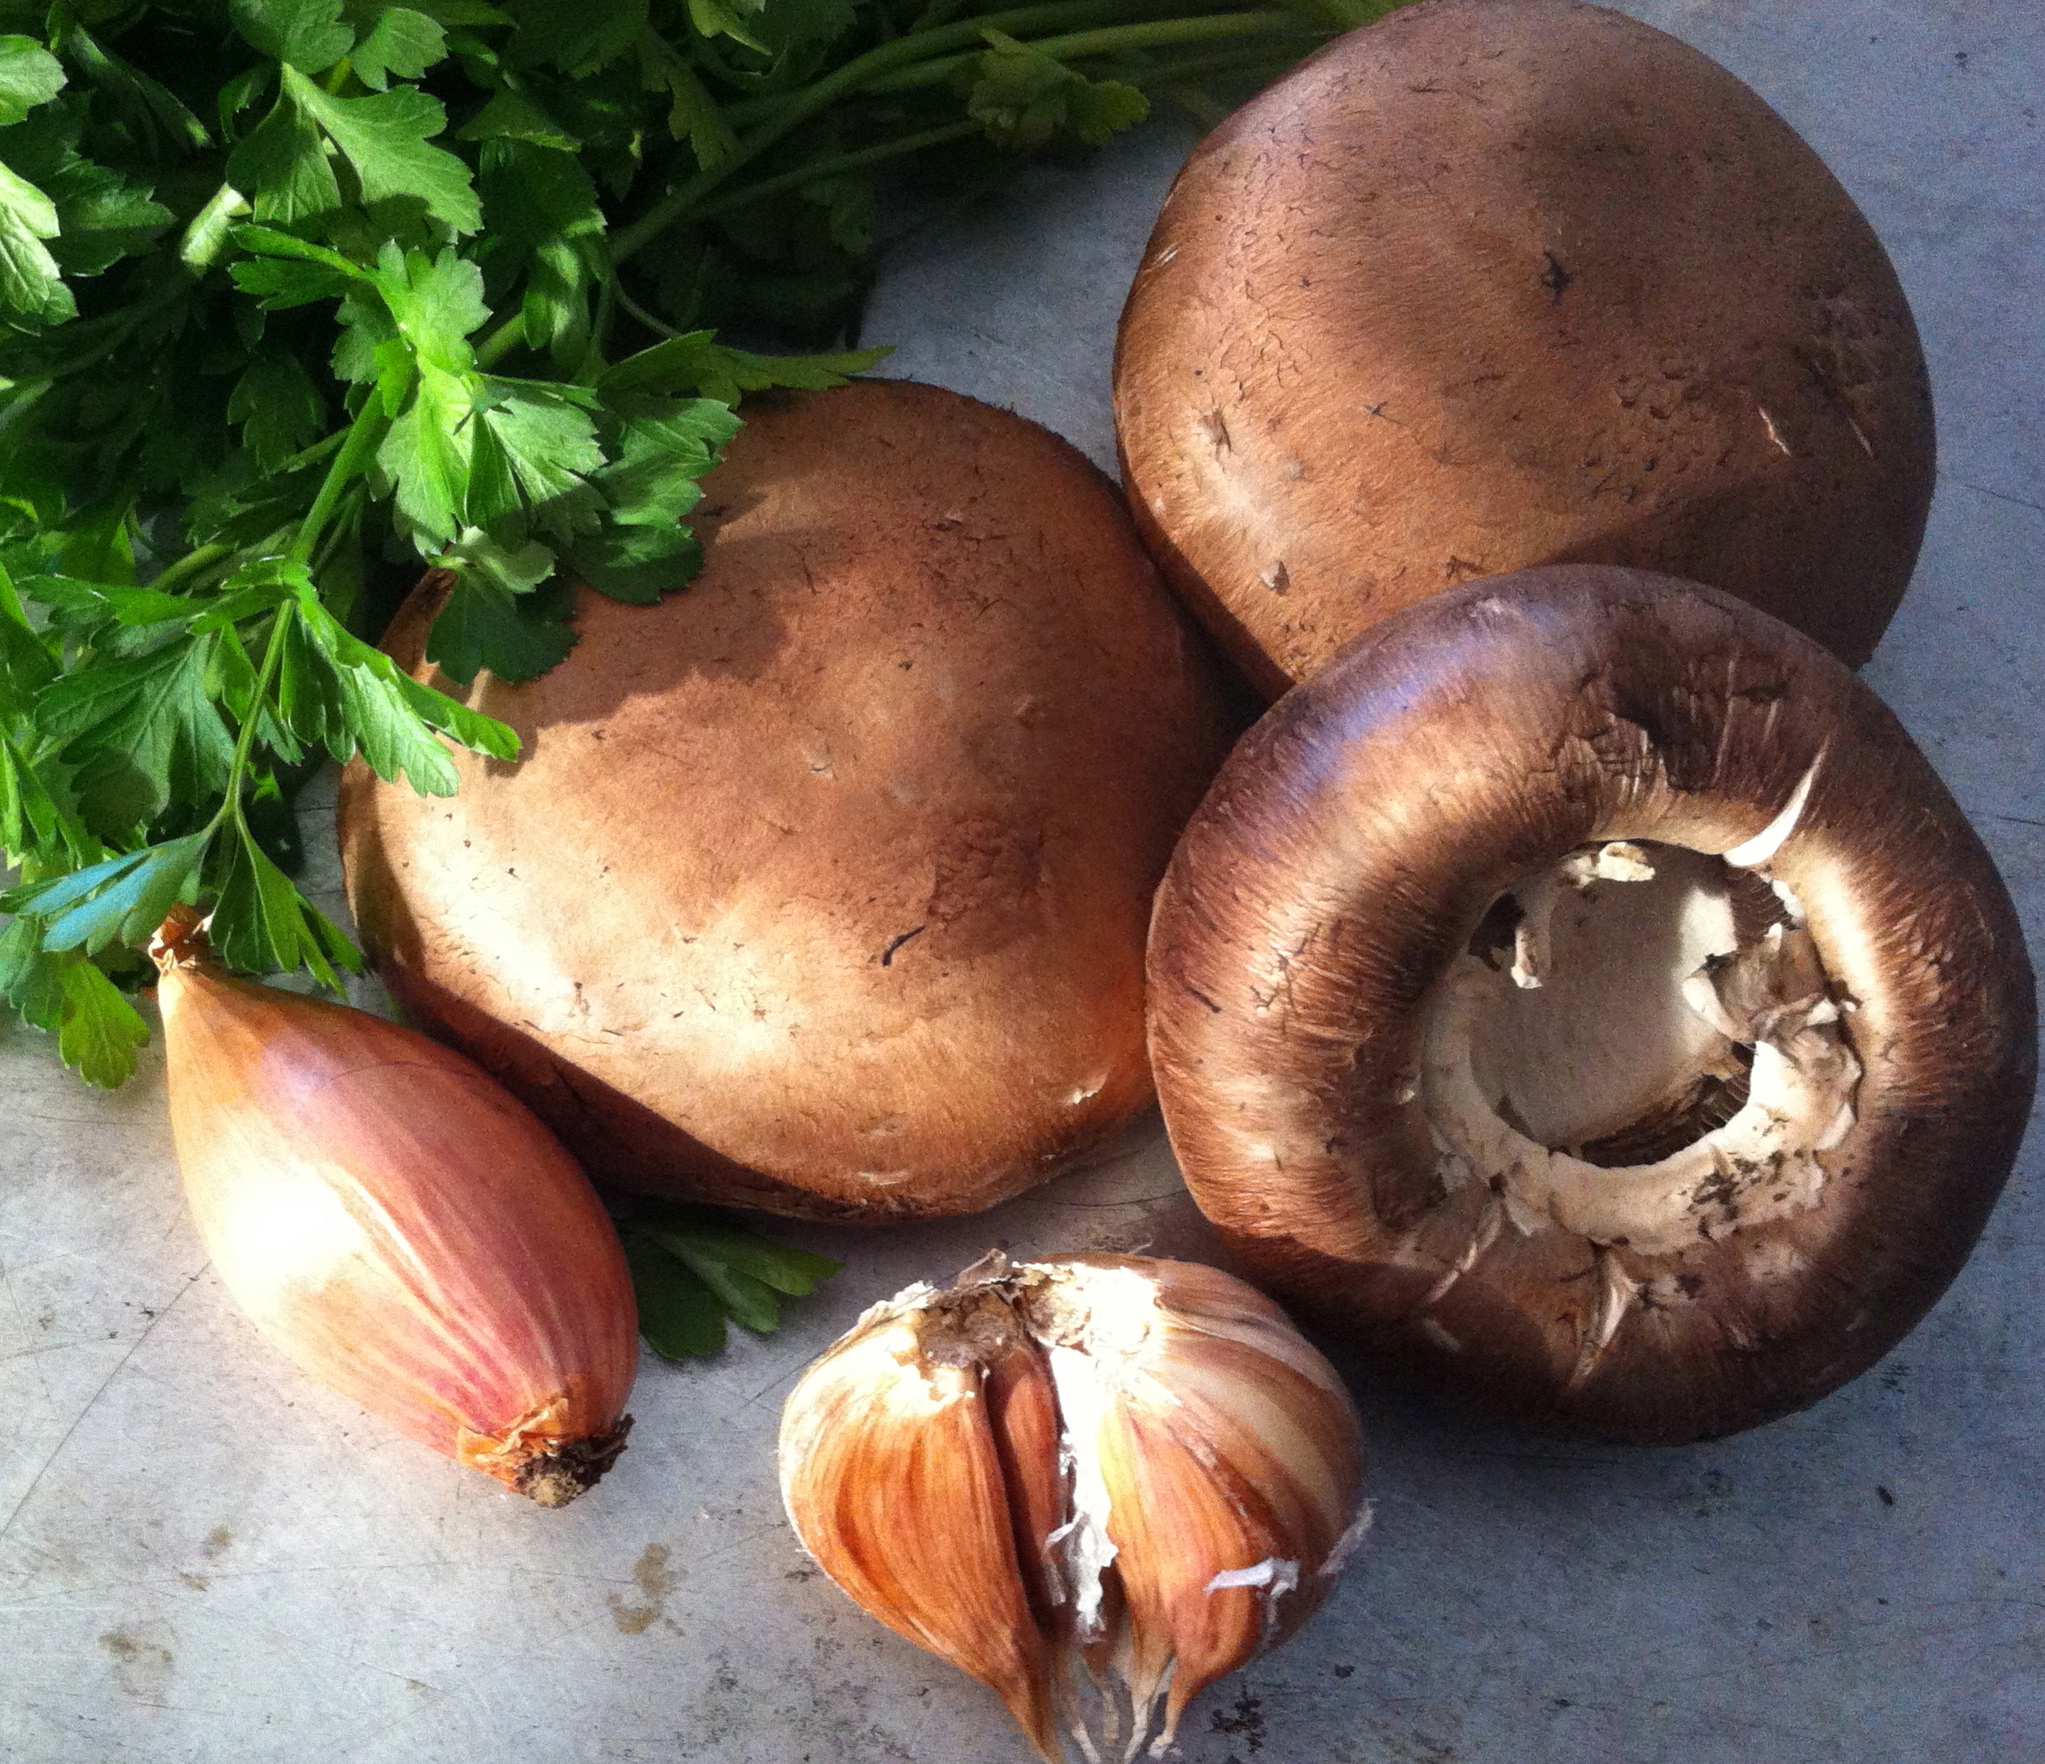
The beauties you see above are portabella caps from the supermarket. Sometimes called portobellos, they were developed by Pennsylvania mushroom growers who found that cremini mushrooms grew large, wide, meaty caps when left unharvested for a few more days. Both cremini (often labeled “Baby Bellas”) and portobella, by the way, are the same variety as the common white button mushroom. They’re all cultivated, along with “exotic” varieties such as oyster, maitake (hen-of-the-woods), and shiitake, primarily in Chester County, Pennsylvania, near the town of Kennett Square, the Mushroom Capital of the World. Fungus farmers in the region produce more than one million pounds  of mushrooms a week.

The following recipe is based on the Wild Mushrooms Persillade in The A.O.C. Cookbook, by acclaimed Los Angeles chef Suzanne Goin (available October 29). “Get the pan hot enough, and really pay attention when you are cooking,” she advises. “If the pan is smoking and the mushrooms are getting too dark, turn the heat down; if they give out a lot of water, leave the heat on high and let them cook without stirring—that liquid will evaporate, and then you can carry on, adding a little more butter if needed.” Her take on persillade? “Sizzling the parsley and garlic together in the butter really brings out their flavors and permeates the whole dish with a deep, woodsy, very French flavor.”

And how. These make a wonderful addition to steak-and-potato night. Next go-round, I might spoon them over polenta or garlic-rubbed toasts, or into a farro pilaf. When it comes right down to it, I could probably eat them on cornflakes.

Mushrooms Persillade

Adapted from The A.O.C. Cookbook, by Suzanne Goin (Alfred A. Knopf, 2013)

Goin called for wild mushrooms such as chanterelles, but I was shopping a supermarket on the fly. The freshest-looking mushrooms there were the aforementioned portabella caps, so I grabbed those, along with a bunch of parsley. The garlic I had at home, and I realized I had a lone shallot there as well, just pining to join the party. Goin’s classic addition of fresh thyme went by the wayside, too, because I simply forgot to add it. C’est la vie.

1 pound mushrooms such as portabella, cremini, or white button mushrooms, cleaned and trimmed

2 tablespoons extra-virgin olive oil

1 tablespoon unsalted butter

About 1 tablespoon chopped shallot (did I think to measure? no), optional

1 heaping teaspoon finely chopped garlic

1½ tablespoons finely chopped fresh flat-leaf parsley

Coarse salt and freshly ground pepper 

1. Cut the mushrooms into roughly 2-inch pieces. (They’ll shrink when you cook them, so don’t make them too small.) Heat a large sauté pan or skillet over high heat for 2 minutes. Add olive oil to pan and heat another minute. Swirl in butter and, when it foams, add the shallots and cook until unless they just lose their rawness. Scatter the mushrooms in the pan and season with salt and pepper.

2. Sauté the mushrooms for about 5 minutes, stirring occasionally, until they’re tender and a little crisp. (The cooking time will depend on the particular mushrooms you use.)

3. Move the mushrooms to make a little empty spot in the pan. Place the garlic in that empty spot; cook for a minute, until it sizzles and just turns translucent. Add the parsley and toss well, stirring with a wooden spoon, too combine quickly and integrate the garlic and parsley with the mushrooms. Taste for seasoning and serve.

OCTOBER’S FRESH SHELL BEANS

blog-fresh shelling beans

Like almost any expat southerner, I am besotted with the shell beans of summer. The native American legumes, often referred to as peas, have pods that must be removed before the moist, tender beans (ie., seeds) can be cooked. Black-eyed peas, pink-eyes, lady peas, cream peas, purple-hulls, and the small, pale butter beans called sieva, or sivvy, beans are among those that have long been prized for their delicacy and nuances of flavor.

Up North, the closest most people get to fresh black-eyed peas is the frozen-food aisle. A few farmers at the Greenmarket do offer butter beans in season, as well fresh fava beans (which belong to a different, Old World genus of the legume family), and, occasionally, flageolets.

Perhaps because I didn’t get my fill of shelly beans this summer, I’ve paid particular attention to the bumper fall crops of pinto, cannellini, and cranberry beans at the Greenmarket. (The generic term cranberry bean, by the way, covers examples such as Tongue of Fire, Vermont Cranberry, French Horticultural, Roman, borlotti, and the October beans of southern Appalachia.)

The brilliant thing about these beans when fresh is they take only about 20 to 30 minutes to cook and do not require an overnight soak. They have a rich, round flavor that has a bit more heft than summer shell beans, and make a wonderful component to meals in October—nature’s great swing season.

It worries me, though, that people aren’t standing in line to buy them. This is true, even for summer’s butter beans and favas. I mean, down South, those stands would be mobbed. Maybe the market for them might improve if they had an on-site sheller—someone who tosses a customer’s pounds of beans in the pod into a commercial pea sheller and gets the job done lickety-split. Hey—there’s a job opportunity for me, now that Martha Stewart Living is restructuring and cut me loose, effective yesterday. I’ll think about it over lunch.

Fresh Cranberry Beans With Tomatoes, Sage, and Egg Sauce

These beans are delicious alongside a steak or over pasta or thick slices of buttered toast, but today I’m eating them in a deep bowl with soft-boiled eggs cut in—a fast-track homage of sorts to Bill Neal’s mixed beans in egg sauce.

2 cups shelled fresh cranberry beans or other shell beans

1 to 2 cloves garlic (optional)

2 large eggs

Unsalted butter or extra-virgin olive oil

A small ripe tomato, chopped

Coarse salt and freshly ground pepper

Chopped fresh sage leaves, to taste

1. Place the beans and garlic (if using) in a saucepan, add enough water to cover, and bring to a boil over medium-high heat. Lower the heat to a brisk simmer and cook until the beans are tender, 20 to 30 minutes. (Taste the beans to make sure they’re cooked through and creamy, and if they start to look dry before they’re ready, add some more water.)

2. Take the beans off the heat when ready. Fish out the garlic and drain off any excess water. Meanwhile, soft-boil the eggs. Carefully peel them, put them in a shallow dish, and coarsely chop.

Fold some butter and the tomatoes into the hot beans. Immediately stir the eggs into the beans to coat and season with salt and pepper. Add the sage, and, as Bill Neal would say, rush to the table.

VIVA MARCELLA!

blog-Marcella

On Sunday, Marcella Hazan, Italy’s greatest gift to home cooks everywhere, died at the age of 89. The world is diminished. And I know I’m not alone in paying tribute in a way she would have appreciated: by cooking. There’s an armload of basil in the refrigerator, just waiting to be transformed into pesto, what she called the most seductive of all sauces for pasta. There’s a bottle on the counter, too. I favor Old Forester over Marcella’s Jack Daniel’s, but, after all, nobody’s perfect.

I know the recipe by heart, but that doesn’t stop me from taking down The Essentials of Classic Italian Cooking from the shelf. Published in 1993, it was an updated compilation of Marcella’s earlier Classic Italian Cook Book (1973) and More Classic Italian Cooking (1979). Aside from 50 new recipes, additions included a chapter called “Fundamentals,” a treasure trove of information about ingredients and how they respond to different cooking techniques.

Marcella’s singular voice was famously translated into prose by her husband, Victor. Open the book to any page, and you begin to gain insight into the Italian art of making something transcendent out of the simplest everyday ingredients.

A classic example of what I mean is Finocchio in Insalata, my go-to salad after roast pork loin or other rich meats. “No vinegar or lemon juice is used on raw finocchio when it is served alone,” the note reads. And so you cut a fennel bulb into the thinnest possible rings, soak them in a couple of changes of cold water, dry them, then “toss in a serving bowl with salt, enough olive oil to coat well, and liberal grindings of black pepper.” In Amarcord, Marcella’s autobiography, she recounted that this salad was part of the lunch she served Craig Claiborne in 1970. He was enchanted. And Marcella, a biologist who had left life in Italy to marry Victor, a New Yorker, was propelled into a new career.

Because Marcella’s recipes are delicious and virtually foolproof, practically everyone has at least one favorite, and the New York Times is compiling a wonderful assortment of them. (Somewhere, Craig Claiborne is smiling.) I think the first chicken I ever cooked was her Roast Chicken with Two Lemons, and I love it still. Her Meatballs and Tomatoes? My husband’s first and only meatball recipe. And odds are the most Googled recipe of all time is Tomato Sauce with Onion and Butter, which has (aside from pasta and Parm) just four ingredients: fresh or canned tomatoes, an onion, five tablespoons butter, and salt. Its fame continues to grow; if only someone had remembered to tuck a copy inside Voyager 1, it could have gone interstellar.

Marcella was a formidable teacher, and her reserve stood in contrast to the ebullience of Julia Child, to whom she is often compared. At the end of the day, though, she was really more about sharing than instructing, and the tone of her books is relaxed and alluring in a way that is typically Italian. “Pesto is the sauce the Genoese invented as the vehicle for the fragrance of a basil like no other, their own. Olive oil, garlic, pine nuts, butter, and cheese are the only other ingredients,” she wrote. “It is unlikely that any pesto will taste quite like one made with the magically scented basil of the Italian Riviera. But never mind, as long as you have fresh basil, and use no substitute for basil, you can make rather wonderful pesto anywhere.”

She’s respectful of cooks who insist that pesto isn’t pesto if it isn’t made with mortar and pestle. The word, of course, comes from the verb pestare, to pound, and she carefully outlines the traditional method. But, “it would be a greater pity … to pass up making pesto at home because one has not the time or inclination to use the mortar,” she wrote, and preceded the mortar recipe with a “nearly effortless and very satisfactory” food processor method.

In addition to being easy, the recipe is a revelation to people who find pesto too intense. It’s not overloaded with garlic (“Never, in good Italian cooking, should it be allowed to become harshly pungent”), and the proportion of tangy pecorino romano to Parmigiano is less, since romano is more potent than other pecorinos. A little butter enriches and rounds out the flavor beautifully. Thank you Marcella, for everything.

Marcella’s Pesto (Food Processor Method)

If freezing pesto, make the sauce to the end of step 1 and freeze without the cheese or butter in it. Stir in those ingredients after the pesto is thawed, just before using. When cooking spaghetti or fettuccine for the pesto, reserve some of the cooking water, and add a little to the pesto—that helps it coat the pasta more easily. The full Genoese treatment, Marcella notes, is to add boiled new potatoes and green beans to the pasta. Drizzling the pesto on potatoes or green beans separately is also pretty great. Oh, who am I kidding? I could eat it on cornflakes. 

2 cups tightly packed fresh basil leaves

½ cup extra-virgin olive oil

3 tablespoons pine nuts

2 garlic cloves, chopped fine before putting in the processor

Salt

½ cup freshly grated Parmigiano-Reggiano

2 tablespoons freshly grated Pecorino Romano

3 tablespoons butter, softened to room temperature

1. Wash the basil in cold water and gently pat it dry with paper towels. Put the basil, along with the olive oil, pine nuts, chopped garlic, and an ample pinch of salt in the food processor and process to the desired consistency. Marcella likes it uniform and creamy, but I prefer it a bit coarser. Perhaps one day, I’ll see the error of my ways.

2. Transfer the sauce to a bowl and mix in the two grated cheeses by hand. Then mix in the softened butter, distributing it evenly throughout the sauce. To store, press plastic wrap on the surface of the pesto and refrigerate.

blog-Marcella1

SALAD SLOTH

blog-lettuce prep

The last thing I want to do during the pre-dinner hustle—especially on a weeknight—is haul out the salad spinner and prep salad greens. Not only is it a royal pain, but damp leaves aren’t very receptive to a vinaigrette or other dressing (for three classics, click here).

That’s why, a few days ahead of time, I wash and dry the greens, then loosely roll them in paper towels and pop them in a plastic bag. The object here is to remove any excess water (to forestall decay), while helping the greens retain their own moisture, and I learned the trick from my former colleagues at Gourmet. It works fabulously wellexcept, of course, when I don’t have the time, energy, or inclination to follow through. And then it’s all too easy to put off that virtuous salad until another night, and then another. Goodness, how the week can fly by.

I look at those untouched heads of lettuce tucked away in the crisper drawer and suffer a major attack of the guilts. Slightly wilted leaves can be revived in cold water, but what about the nutrients? Lettuce is no lightweight: The delicate leaves are full of potassium and beta-carotene, which is converted to vitamin A in the body. We all tend to think of beta-carotene as the prerogative of carrots and other brightly colored vegetables, but in lettuce, the yellow-orange pigment is hidden by green chlorophyll. Lettuce also contains vitamin C, calcium, iron, and copper; in general, the darker the leaf, the more nutritious it is.

I got to feeling better about my salad sloth after researching nutrient retention for a reader’s question—more accurately, a cri de coeur—that appeared a while back in my weekly column for the food-forward environmental website TakePart. (Forgive the shameless self-promotion, but, hey, they pay me to learn really cool stuff and then write about it.)

One of the absorbing things I came across was a September 2007 piece titled “Evolution of Antioxidant Capacity during Storage of Selected Fruits and Vegetables,” published in the Journal of Agricultural and Food Chemistry. The researchers, molecular biologists at the University of Liège, in Belgium, found that in most fruits and vegetables, storage does not adversely affect antioxidant capacity. “In some cases, an increase of the antioxidant capacity was observed in the days following their purchase, accompanied by an increase in phenolic compounds,” they wrote. “In general, fruits and vegetables visually spoil before any significant antioxidant capacity loss occurs except in banana and broccoli. When ascorbic acid or flavonoids … were concerned, the conclusions were similar. Their content was generally stable during storage.” What a relief.

That particular study never made its way into my column, but one that did was a very recent discovery, published in the journal Current Biology, by scientists at Rice University and the University of California at Davis. They found that for days after harvest, lettuce—as well as cabbage, spinach, zucchini, carrots, sweet potatoes, and blueberries—continue to respond to circadian rhythms (day-night cycles of light), allowing them to ramp up the phytochemicals that protect them from being eaten by insects and other herbivores at certain times of the day. Interestingly, those same chemical compounds have anticancer effects when eaten by humans.

It’s not known yet whether all-dark or all-light conditions shorten the shelf life of fruits and vegetables, but it’s amazing to think that we could boost the health benefits of produce simply by how we store it. I’ll keep you posted.

LATE-SUMMER PLUMS: A MARKET STORY

blog-market plums

With this brisk, wish-I-had-a-jacket weather, people at farmers markets are embracing autumn with open arms. I, for one, am not jumping the gun. We’re going to be eating apples for months, remember?

But even though I’m clinging to summer’s stone fruits (and the last of the snapdragons and zinnias), a bit of finesse in the kitchen goes a long way. This is especially true when you have absolutely no time to waste, which is why I’m keeping this short and sweet.

I learned to roast stone fruits from cookbook author and all-around culinary goddess Georgeanne Brennan. She often does hers in a wood-fired oven, but a regular old oven works fine too, even though it isn’t nearly as romantic. I think I learned the trick of working some crème fraîche into fresh ricotta from her, too; the thickened cream gives the fluffy, uncomplicated ricotta a nutty sweetness, a little tang, and voluptuous body.

I love the rich, faintly spicy flavor of roasted plums all by themselves, but you could easily use other stone fruits or a mixture. And you could, of course, substitute a dollop of mascarpone or softly whipped heavy cream for the creamy ricotta.

Roasted plums are versatile. They swing homey or haute, and are ideal if you aren’t a baker or need a gluten-free dessert, because there is no dratted crust or crumble topping involved. They cook quietly all by themselves and make the kitchen smell heavenly. And, if you are very fortunate, there will be a spoonful or two left for tomorrow morning.

Roasted Plums with Creamy Ricotta and Honey

1 cup fresh ricotta

About ¼ cup crème fraîche

A dash of pure vanilla extract

Sugar

6 to 8 plums, depending on size, or a mixture of plums and peaches and/or nectarines

Extra-virgin olive oil

1. Preheat the oven to 475º. Stir together the ricotta, crème fraîche, vanilla, and about 2 tablespoons of sugar, or to taste in a bowl. Pop that into the fridge until ready to use.

2. Cut the plums from stem end to bottom, first down one side, then the other. Gently twist the halves together; if they separate from the pit easily, that means they are freestone. Otherwise, they’re clingstone, so cut the flesh away from the pit in largish wedges. Put the plums in a shallow baking dish just large enough to fit them in 1 layer. Drizzle with about 1 tablespoon oil and turn them a few times to coat. Generously sprinkle with sugar and turn once or twice more. Roast until the plums have just collapsed and are tender and just caramelized enough, about 20 minutes.

3. Serve the plums in small bowls with the creamy ricotta and honey, for drizzling, on the side.

SLOW-HAND SQUASH

blog-summer squash

The fetishization of baby yellow summer squashes and zucchini (which is a type of summer squash) began with restaurant chefs, and who can blame them? On the plate, the barely cooked vegetables look dramatic and delicate all at once, whether served whole or sliced into little pale golden or green coins. And it didn’t take long before parents jumped on the bandwagon: A bowl of steamed tiny pattypans is cute enough to tempt any child who’s leery of vegetables.

I get it, I really do. But beauty and charm can only take you so far. What I’m craving, especially now that the days are growing shorter and shorter, are summer squashes and zucchini that have been allowed to stay on the vine until they’ve had a chance to develop lush flavor and texture. When cooked, they taste ripe—juicy, well-rounded, and full of nuance.

Lately I’ve added something new to my summer squash repertoire—cooking them low and slow. Although this method sounds counter-intuitive for a weeknight, it is extremely useful when multitasking is the name of the game. The rest of supper is simple: I’m happy with just the cooked squash on a bed of hot buttered rice, with a few slices of tomato on the side, but roasted chicken thighs or broiled sausages—even a little crisp-fried bacon or pancetta—will round out the meal nicely.

By the way, if you’ve been growing squashes this summer and the dratted plants are not producing, Horticulture magazine explains why here. Better luck next year!

Slow-Hand Squash

I don’t need onion or garlic running interference here, but that’s just me. Add those embellishments if so inclined, but do keep a closer eye on the stove.

A pound or so of mixed yellow summer squashes and zucchini

Extra-virgin olive oil

Coarse salt and freshly ground pepper

Fresh basil leaves or a mixture of basil and flat-leaf parsley

1. Cut the squashes and zucchini into rounds or half moons that are about ¼ inch thick. It doesn’t really matter; just try to make them all the same, so they cook evenly. And don’t make them too thin, or they’ll burn or disintegrate into mush. Once you put down the sharp knife, get some rice working and pour yourself a glass of wine.

2. Heat a generous swirl of olive oil in a skillet over moderately low heat. Add the squash in a single layer, or as close to it as you can manage, season with salt, and cook until golden to golden-brown on the bottom. Resist the impulse to stir. Instead, get comfy, charge the cell phone, take the butter out of the fridge, hug whoever walks through the door. Odds are, he or she will say, “What smells so good?” and hug you back.

3. Turn the squash over. Add a little water and cook until it evaporates. Give the squash a bit more time, until the slices are golden-brown on the other side. Season with salt and pepper. Spoon over hot buttered rice or serve alongside, and don’t forget to sprinkle with the herbs.

JUMBLEBERRY PIE: A MARKET STORY

blog-jumbleberry pie1

“A trip to the farmers market can be as inspiring and as uplifting as a trip to Yosemite,” Marion Cunningham once wrote, and that is especially true in August—it is such an opulent month.

In Manhattan, the Union Square market is brimming with tomatoes and corn, peaches and melons, eggplants and peppers, yellow crookneck squash and zucchini, and berries. Lots of berries. They are impossible to resist: Summer will soon be at the end of its tether, and Sam and I can’t miss out on an old-fashioned jumbleberry pie, made with raspberries, blueberries, and—most importantly—blackberries. When cooked, they balance the sweetness of the other two fruits with their winey depth.

I splurge on the berries from Phillips Farms without batting an eye. Their protective plastic clamshells ensure that they’ll arrive home unscathed, and I’ll return the cases as soon as I can. I scoop up a bunch of the farm-grown dahlias, too. I’ve admired them for weeks, and their colors, which grow more intense as fall approaches, remind me my grandmother’s late-summer garden.

blog-jumbleberry pie3

Jumbleberry pie was a favorite dessert of hers, but I don’t think I ever saw an actual recipe until I arrived at Gourmet. It appeared in the July 1991 issue, and I promptly copied the page and stuck it in the back flap of my Filofax. Because it combines ease of preparation with a serious wow factor, it makes a fabulous contribution to a weekend house party. You will definitely be invited back.

That pie has stayed in my culinary bag of tricks for 22 years, now—and amazingly, so has that piece of paper, complete with recipe tweaks and lurid berry stains. It still travels with me every summer. Happy August! See you in September.

JUMBLEBERRY PIE

From The Gourmet Cookbook (Houghton-Mifflin, 2004)

The 1991 recipe was updated for The Gourmet Cookbook, where it was called Three-Berry Pie. It’s served with vanilla cream, which is nothing more (or less) than cold heavy cream beaten to soft peaks with sugar and vanilla. One shortcut to glory if you’re making this at a friend’s house on a weekend is to prepare the pastry dough ahead of time. Form it into two neat disks, wrap well in plastic wrap, then a ziptop bag, and put it in the cooler, on top of ice packs and those bottles of rosé you’ve been hoarding. Toss the sugar, cornstarch, tapioca, and salt in another ziptop bag, and you are in business.

1 cup granulated sugar

3 tablespoons cornstarch

2 tablespoons quick-cooking tapioca

¼ teaspoon salt

3 cups blackberries

2 cups raspberries

2 cups blueberries

All-purpose flour, for rolling

2 recipes Pastry Dough (for a double-crusted pie)

1 large egg, lightly beaten, for egg wash

1 tablespoon sanding sugar or granulated sugar

Accompaniment: Vanilla Cream (see above note)

Put a large baking sheet on middle oven rack and preheat oven to 450ºF. Whisk together granulated sugar, cornstarch, tapioca, and salt in a large bowl. Toss with berries.

Roll out 1 piece of dough (keep remaining piece chilled) on a lightly floured surface with a lightly floured rolling pin into a 13-inch round. Fit it into a 9-inch pie plate. Trim edge, leaving a ½-inch overhang. Refrigerate shell while you roll out remaining piece of dough on lightly floured surface into an 11-inch round.

Spoon filling into shell. Cover pie with pastry round and trim, leaving a ½-inch overhang. Press edges together, then crimp decoratively. Brush top of pie with egg wash and sprinkle all over with sanding sugar. With a small, sharp knife, cut 3 steam vents in top crust.

Bake pie on hot baking sheet for 15 minutes. Reduce oven temperature to 375ºF and continue to bake until crust is golden brown and filling is bubbling, about 45 minutes more. Cool pie on a rack for at least 3 hours before serving (filling will still be juicy). Serve with vanilla cream.

blog-jumbleberry pie6

OLD-WORLD OKRA

blog-okra

Most Americans are squeamish about viscosity, and so tend to pigeonhole okra as a quaint southern specialty. It has its place simmered in a gumbo, pickled in a spiced brine, or enrobed in a cornmeal batter and fried, they say, but still.

There is a mighty fine line between tolerant and patronizing, and what I find quaint in this day and age is such a blinkered world view. For millennia, okra has been a popular vegetable in India, Asia, the Middle East, and, of course, Africa. It originated on that continent (along with barley, wheat, sorghum, millet, and flax) in what geobotanists call the Abyssinian center of origin of cultivated plants—which includes Ethiopia and parts of Eritrea and Somaliland. One of the first descriptions of the cultivated vegetable was written by a Spanish Moor who visited Egypt in 1216.

Okra is a tropical plant that came to the Americas via the slave trade, or perhaps even earlier, with the Spanish and Portuguese. Along with cotton and hibiscus, it’s a member of the mallow family, and a dip into Will Weaver’s Heirloom Vegetable Gardening will tell you that two early areas of cultivation centered on New Orleans and Charleston. “By the latter half of the eighteenth century,” Will wrote, “okra began appearing in gardens in the Middle States, especially in the region around Philadelphia, which at one time had a large Creole population. Okra was depicted in a number of still life paintings by members of the Philadelphia Peale family during the 1820s, so it is possible to form an impression of what those old varieties were like.” There’s a very nice example, by James Peale, of what Will is talking about in the Metropolitan Museum of Art.

Heirloom okra is worth growing for the cultivar names alone—among them Stubby, Cow Horn, and the trilogy of late-19th-century okras Will calls “the three velvets”: Green Velvet, White Velvet, and Red Velvet, with its distinctive red pod.

My mother had a sunny patch in the garden that was just right for okra, and it always flourished until the first frost. The seed pods turn from tender to tough the larger they grow, so it pays to check plants every day. One of my earliest taste memories is baby okra—delicate, thimble-sized, and eaten raw, right off the plant.

Okra’s flavor is hard to pin down—it’s elusive in an asparagus-artichoke sort of way. Like those two vegetables, it’s good steamed or sautéed; larger pods are best for grilling or roasting. And like asparagus and artichokes, too, okra is delicious with nothing more than a drizzle of warm melted butter, vinaigrette, or garlicky mayonnaise.

Personally, I do not mind the fact that okra is viscous; that ooze factor translates to great body in a quick, hot sauté with tomatoes and yellow crookneck squash. (Spoon the tangle over hot buttered rice and eat immediately.) With this week’s supply, though, I was tempted to go in an Indian direction, sautéing the okra, then tossing with cumin and mustard seeds, chopped ginger, fresh hot chile, and a little lime juice.

But then I spied the jar of preserved lemons that anchors one way-back corner of the fridge, and was reminded of a recipe in the cookbook Jerusalem that I first made last summer. I thought it was just a fling, but I think it’s love. True love.

Charred Okra with Tomato, Garlic & Preserved Lemon

Adapted from Jerusalem: A Cookbook, by Yotam Ottolenghi and Sami Tamimi

The book’s hednote to this recipe mentions that Sami’s grandmother used to thread okra, like a necklace, onto a long string, hang it in a cool place, and leave it to dry. “It would later be rehydrated when cooking it in a yachne, a Palestinian meat and tomato stew, where it imparted a glorious flavor and thickened the sauce.” Yum.

A few handfuls of very fresh, very small-to-smallish okra pods, rinsed

Extra-virgin olive oil

A few cloves garlic, sliced thin

Thinly sliced preserved lemon peel (store-bought or homemade)

A handful of cherry tomatoes, halved, or wedges of small tomatoes

Chopped fresh parsley leaves, or a blend of chopped parsley and cilantro, to taste

Half a fresh (not preserved) lemon

Flaky sea salt, such as Maldon, and freshly ground black pepper

1. With a sharp paring knife, trim the okra pods, removing the stem just above the pods so as not to expose the seeds (and trigger an ooze onslaught). Heat a large cast-iron or other heavy skillet over high heat for a few minutes until it is very hot. Working in batches so you don’t crowd the pan, dry-cook the okra, shaking the pan occasionally, for about 4 minutes per batch. The okra pods should have the occasional dark blister.

2. Return all the charred okra to the pan and add a generous drizzle of olive oil, the garlic, and preserved lemon. Stir-fry about 2 minutes, shaking the pan. Reduce the heat to medium and add the tomatoes, a couple of tablespoons water, the parsley, a generous spritz of lemon juice, and a grind or two of pepper. Gently stir everything together and continue to cook until the tomatoes are warmed through, 2 to 3 minutes. Transfer to a serving dish, dress with more olive oil and a sprinkle of that beautiful flaky salt, and serve.


BLUEBERRY TIME

blog-blueberries

I never developed a true appreciation for blueberries until about 20 years ago, when I spent summer weekends knocking around the New England coast. It was there I had my first taste of the small, intensely flavored wild ones, and soon carried a small plastic pail tied to my knapsack as a matter of course. Pancakes, pies, and sturdy cobblers that oozed indigo-violet juice were well worth constantly scratched legs and mysterious little bites.

Cultivated blueberries are larger, milder, sweeter, and (unsurprisingly) able to withstand shipping. I have to say I’m a fan, because 1.) I have neither the time nor patience to find and pick the wild ones. 2.) I am so over mysterious little bites. 3.) A handful of fresh blueberries every day provides you with a comforting dose of the antioxidant anthocyanin. 4.) The story behind the development of cultivated blueberry varieties is an interesting one, and it happened practically in my own backyard.

Enter one Elizabeth Coleman White (1871–1954), the eldest daughter of a cranberry farmer from the Pinelands (aka Pine Barrens), a heavily forested million-acre stretch of coastal plain in southern New Jersey. White and her father formed an alliance with a plant breeder and the local woodsmen called “Pineys,” who used their hunting and foraging skills to search the area and bring back the best plants for propagation. Click here for an evocative account of what that entailed.

The cultivated Jersey blueberries we’re getting at the Greenmarket this season have been juicy and ultrafresh. Although I’m not the baker in this family, I was moved to try the shortcake recipe below, from the July-August issue of Martha Stewart Living. There’s no slicing of fragile biscuits or piling of equally fragile berries involved; instead, the berries are simply baked into the shortcakes. How clever is that? You can serve extra berries on the side, of course, but the easy portability of the shortcakes is a big plus in my book—as is the fact that whipped cream, although very nice with these, isn’t a vital component. Which is another way to say that they’re fabulous for breakfast.

Berry Shortcakes

From Martha Stewart Living (July-August 2013)

Now, freelancer Nora Singley, who developed this recipe, used two ounces of blueberries and two ounces of diced strawberries to make a total of eight shortcakes. I simplified matters by making just blueberry because, well, we ate the last of the strawberries yesterday. If you want to go halfsies, though, simply transfer half the flour mixture to another bowl so you can mix in the berries separately.

Nonstick cooking spray

1½ cups all-purpose flour

2 tablespoons granulated sugar

¾ teaspoon coarse salt

1¾ teaspoons baking powder

¼ teaspoon baking soda

1 stick cold unsalted butter, cut into small pieces

8 ounces cream cheese, 2 ounces cold, 6 ounces room temperature

4 ounces blueberries (about 2/3 cup), plus more for serving

¾ cup well-shaken buttermilk

1/3 cup confectioners sugar, plus more for serving

1¼ cups heavy cream

1. Coat 2 parchment-lined baking sheet with cooking spray. Whisk together flour, granulated sugar, salt, baking powder, and baking soda in a large bowl. Incorporate butter and cold cream cheese into flour mixture with a pastry cutter or your fingers until mixture resembles coarse meal. Transfer to freezer and chill 30 minutes.

2. Preheat oven to 425° with racks in upper and lower thirds. Add blueberries to flour mixture. Gradually stir in buttermilk, gently folding with a rubber spatula until a sticky dough forms. (Do not overmix.) Divide dough into 8 even mounds and place 2 inches apart on baking sheets. Bake, rotating halfway through, until shortcakes are golden brown, about 20 minutes. Let cool on baking sheet 5 minutes, then transfer to wire racks to cool completely.

3. Meanwhile, beat together remaining 6 ounces cream cheese and confectioners sugar with a mixer on medium speed until smooth. Gradually add heavy cream, beating just until mixture becomes smooth and thick, about 1 minute. (Do not overbeat.) Serve alongside shortcakes and additional berries, with confectioners sugar for sprinkling.

blog-blueberries2

PIE CHERRIES

blog-pie cherries1

You can never go overboard when buying sour cherries—what my grandmothers would have called pie cherries. Their season is ephemeral, and when they’re gone, they’re gone. So this July, I’ve been buying quarts and quarts. (Quick market tip: Cherries are always sold ripe; green, pliable stems signify freshness.)

We’ve enjoyed some of my haul in sour cherry lemonade cocktails or a pie (for a favorite recipe, click here), if it’s not too hot to turn on the oven. The rest, though, I’ve frozen for the winter. A spiced cherry-cranberry chutney (or perhaps cherry-quince) will be nice with roast pork loin or duck around the holidays, for instance. And although the morality tale about George Washington chopping down a cherry tree is actually a morality myth, when our first president’s birthday comes around in February, I’d much rather celebrate with a bright-flavored pie instead of a sales-weekend shopping spree. I’ll bet there will still be enough fruit left in the freezer to be cooked down into a sauce or compote to serve with Sam’s flourless chocolate cake or spoon over ice cream.

It’s always tempting to freeze the cherries whole and worry about the pits at a later date, but trust me, just get it done. Pitting pie cherries doesn’t take all that much time, and because they’re softer than sweet cherries, you don’t need a cherry pitter—a gadget that’s impossible to find in the kitchen drawer when you need it, anyway. Just remove each cherry’s stem and gently squeeze out the pit from that end, or coax it out with a straightened paper clip. Always work over a bowl to catch the juices and wear an apron or old T-shirt to field any (indelible) juice stains.

If you’ve earmarked the cherries for preserves or sauces, just spoon them with their juices into ziptop freezer bags and chuck them into the freezer. But if you’d rather keep them as whole as possible (they’re prettier in a pie that way), spread them on a rimmed baking sheet and freeze them until they’re as hard as marbles; then bag them and refreeze. They won’t stick together, and later you can open the bag, take out however many you want, and pop the bag back into the freezer.

For years, I’ve frozen cherries on baking sheets lined with paper towels—I was worried they’d pick up a metallic flavor. But this year, for the first time, Sam saw my prep. He was aghast, but tried to conceal it. “What the—um, look at all the juice you’re wasting. The paper towel absorbs it. And then you throw it away,” he said. He stopped and took a deep, calming breath. “I would use parchment instead.”

How mortifying. And educational. After I bagged the frozen cherries, the parchment was pink with little shards of cherry ice, which I should have added to the juice that accumulated during pitting. (Strained, that went into the freezer, too.) Instead, I collected the spoonful of fragments and fed it to Sam. He deserved it.

blog-pie cherries3