Subscribe:

Enter your email address:

Delivered by FeedBurner

Previous Posts

Categories

Site search


WINTER LOBSTER STEW

Sound conservation methods and unusually warm (yeesh) weather resulted in a record lobster harvest off the coast of Maine this year. The deals at seafood markets and lobster pounds were impossible to resist, and consequently Sam and I ate our fair share of the sweet, succulent meat on carcass-strewn newspaper-lined tables from New York to New England and back. We ate some mighty good lobster.

But winter is when I like lobster (a.k.a. Homarus americanus) the best. The meat is firmer and, well, meatier, with a deep oceanic tang. It tastes like the cold blue water of the Gulf of Maine, and just thinking of that amazing body of water makes me realize that soon it will be time for tiny, tender Maine shrimp.

But not yet. Because the price for lobster is still reasonable at my local seafood market, the other day, I carried home two belligerent beauts and, not wanting to prolong the agony for any of us, cooked them immediately. Once they cooled, I picked, pried, or leveraged every bit of meat out of the shells.

First I considered making a thick chowder, chunky with potatoes and some frozen fresh corn.That gorgeous meat, though, needed very little help. So, instead, I made lobster stew, which is far plainer than chowder. It’s the sort of dish that manages to combine an almost austere simplicity with warming good cheer, and if you can bear to delay gratification, it is even better when made a day ahead. In fact, if you are the type of person who always harumphs when a food writer or chef carries on about the virtues of “marrying flavors,” then make a lobster stew, and eat some of it of it immediately. After refrigerating the rest of it for a day or so, taste it again and get back to me.

The masterful John Thorne, writing about lobster stew in Serious Pig: An American Cook in Search of his Roots (you can pick up a signed copy at John’s Simple Cooking website), maintains that this aging is the secret of a great lobster stew. “It’s as if, somehow, the tide rolled in, bringing with it the mysterious whisperings of undersea flavors. Like the tide, it takes about six hours to happen …. With the arrival of each new tide, the dish grows in subtle complexity.”

And how.

Lobster Stew

Serves 2 to 4, depending on how hungry or generous you are

The procedure below is inspired in part by the three-sentence recipe published in America Cooks, by Cora, Rose, and Bob Brown and published in 1940 (“Cut up and fry lobster meat in butter. Then turn into scalding hot milk, season with butter, salt, pepper, and paprika. Let stand awhile before serving, to bring out the full flavor.”) and John Thorne’s Serious Pig annotations, enormously helpful to any nonexpert lobster-stew maker.

Coarse salt and freshly ground pepper

2 live lobsters (1½-pounders)

1 small onion, chopped

A small handful of fresh parsley leaves, chopped

2 tablespoons unsalted butter

A pinch of cayenne

2 cups half-and-half (avoid ultra-pasteurized, if you can help it)

Plenty of hot buttered toast, for serving

1. Bring about 4 quarts salted water to a boil in a large pot. Add the lobsters head first and cover the pot. Begin timing just when the water returns to a boil; I find it takes 8 to 10 minutes for two 1½-pounders. Fish them out with tongs and transfer them to a platter or large bowl to cool and catch any juices. Now, my advice here is to stop and eat lunch before removing the lobster meat from the shells; it’s far easier to avoid temptation that way, and it gives the crustaceans a chance to cool completely.

2. Divest the lobsters of every scrap of meat you can possibly coax or wrestle out of the nooks and crannies. Save the greenish liverlike tomalley if you like; it’s delicious stirred into the stew, but do be aware that it is where contaminants accumulate. If your lobsters are female, you might also discover the red coral, or roe. Definitely save that—it will add depth of flavor and a beautiful luster to the stew. Because the tomalley and coral are highly perishable even when cooked, refrigerate them and plan to serve the stew the very next day. Cut the large pieces of tail and claw meat into largish but still bite-size pieces.

3. Melt the butter in a large skillet over moderately high heat and add the onion and parsley; sauté until the onion is translucent and softened, a few minutes. Stir in the cayenne and a little of the tomalley/roe if using. Add the lobster meat and hotten it up.

4. Meanwhile, heat the half-and-half in a medium saucepan until it almost simmers (do not let it boil). Scrape all that good stuff in the skillet into the half-and-half and season with salt. Let the stew cool completely, uncovered, before stowing it, covered, in the refrigerator, and know that tomorrow night’s supper will be sublime.

5. Reheat the stew over low heat. Meanwhile, gently warm the leftover tomalley/coral in a bowl set over a small pot of simmering water; once it’s warmed through, stir it into the stew. Season with salt and pepper, serve with the toast, and be blissful.

TURKEY SOUP STARTS HERE

The secret to great turkey soup is a deeply flavored broth, and the secret to that is to jump on it soon after Thanksgiving, while the carcass is still meaty and moist. That’s why I feel obligated to publish this now instead of a bit later in the week.

Naturally, I’m hoping that you followed the path of least resistance (as I did) and simply refrigerated your turkey leftovers on the bone, wrapped in a swatch of burnished skin underneath that helmet of foil. And then opted for a change of pace on Friday, indulging in a really great pizza or skipping dinner entirely in favor of popcorn and the early evening showing of Lincoln.

Turkey broth is staggeringly simple to make (you just add water), and even if the remains of the day were disposed of after the meal—or you were a guest in someone’s home and have no remains—all is not lost. Take advantage of the season and get yourself to the grocery store. There are turkey wings, necks, drumsticks, and sometimes even  the gelatin-rich feet, practically for the asking. You can extend Thanksgiving by making your soup this week, or you can freeze the broth and make soup at a later date. Stracciatella made with turkey broth, late at night in December, after holiday shopping or the opera? I am there. And grateful, all over again.

Turkey Broth 

A turkey carcass, including skin, plus wings and neck (if they haven’t already disappeared)

1. Break the carcass apart into manageable pieces. Salvage enjoyably large pieces of meat for sandwiches or a pot pie, but keep what my former colleague Zanne Stewart calls “a generous fringe” of meat on the frame. Keep the turkey wings and neck whole, and do not throw away a single scrap of skin.

2. Put everything into a large pot and cover with about 3 inches of water. Cover the pot and bring to a boil. Uncover the pot and reduce heat to keep the liquid at a gentle simmer. Set a timer for 3 hours, a nice chunk of time in which to read a novel or re-organize the hall closet. No matter how you choose to spend the time, the fragrance emanating from the kitchen will give you—and every man, woman, or child who walks through the door—a sense of well-being.

3. Remove the bones, skin, and any odd bits drifting around. Let the broth cool, uncovered,  completely, and I mean completely. (If you refrigerate hot broth or soup in a sealed airtight container, it will sour on you.) Refrigerate the broth about 8 hours, or overnight.

4. Remove and discard the congealed fat from the chilled broth. Gently heat the broth over moderate heat. Taste and season with salt and pepper if necessary. Strain the broth through a fine sieve into a bowl (discard the solids). At this point, you may want to let the broth cool completely, then freeze it. Or, if you want immediate gratification, keep reading.

… and Turkey Soup

Heat a nice glug of olive oil in a pot over moderately high heat. Add a smallish onion, chopped; a medium carrot or two, sliced; ditto celery stalks. Cook until barely golden, then add the turkey broth and simmer until the vegetables are tender. Stir in some shredded turkey meat and some cooked rice or pasta to taste and warm through. Heaven.

FIVE THANKSGIVING TIPS

You probably don’t have time to read this because Thanksgiving is only two days away. If you aren’t cooking, odds are you have to travel, and you need the time to fret about potential traffic snarls and perhaps wonder if a copy of Sam Sifton’s Thanksgiving: How to Cook It Well would make a good hostess gift. The answer? No. Instead, make a space for the (marvelous) book on your shelf with a heartfelt promise to do the cooking next year, and go stand in line at the wine shop, like everyone else.

Then again, you may take comfort in procrastination, especially if a dive into the archives may prove helpful at the supermarket, in the kitchen, or at the table, when an innocent “Please pass the yams” can set off a contentious discussion about botanical provenance. And just remember that at Thanksgiving, like any other special occasion, we should all try to be happy with the classic standard invoked by James Beard: “It was a nice party. Nobody cried. Nobody threw up.”

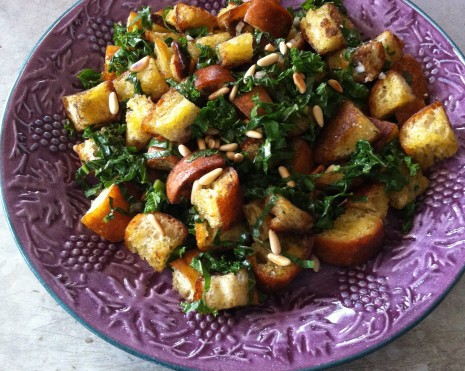
1. For the past few years, a heritage turkey has been my Thanksgiving bird of choice, and I explain why in a recent column for TakePart. I never stuff my turkey—it looks more elegant that way, and anyway, I like my stuffing crisp on top, the way it gets when you bake it in a pan. This year, I’m inclined to deconstruct the stuffing altogether, and instead serve a revved-up rendition of crouton salad with kale.

2. Okay, about yams. I know I’ll go to my grave explaining that even though some sweet potato cultivars are (mis)labeled as yams, these are two completely different root vegetables, and unless you shop at an African, Caribbean, Philippine, or Latin market, you have probably never eaten a true yam. Curious, aren’t you? Click here and more will be revealed.

3. If you find making gravy the most fraught part of Thanksgiving cooking, relax and take a look at last year’s “Gravy Rules,” which may demystify the process. You’ll find a recipe for pan gravy (plus a gluten-free version) as well.

4.  Most people aren’t quite as obsessive as I am about new-crop pecans, but do yourself a favor and taste before using whatever you buy at a supermarket or big-box store. If the nuts are rancid, return them! Odds are they are last year’s crop. I order mine each year from Ellis Bros., in Vienna, Georgia, and you will find my favorite pecan pie recipe here. The secret ingredient is light Karo syrup (which isn’t the same as sweeter, more highly processed high-fructose corn syrup), but this year, I’m going to cut it with New York State sorghum.

5. I cannot imagine Thanksgiving without milk punch, one of the world’s great libations. You’ll find it in New Orleans, of course, and in Georgia and the Carolinas, where it dates back to Colonial days. I wrote about our Thanksgiving milk punch tradition two years ago, and in rereading that post, I realized to my chagrin that I neglected to give a recipe. There are innumerable variations, but below is a very simple, delicious one.

Milk Punch

Makes 4 drinks

1 cup bourbon or rum

¼ to ½ cup sugar (preferably superfine, which dissolves easier)

2 cups cold whole milk

A nip of pure vanilla extract

Freshly grated nutmeg

Combine the bourbon or rum and ¼ cup sugar in a pitcher and stir until the sugar is completely dissolved. Stir in the milk and vanilla. Taste and stir in more sugar if desired. Fill four glasses with ice and divide punch among them. Top with the nutmeg, clink glasses, and say, “Happy Thanksgiving!”

SCRATCH SUPPER: CROUTON SALAD WITH KALE

I’m all for kitchen thrift, but I take exception to the notion that croutons, like bread crumbs, are a byproduct of a loaf (often one of indifferent quality) gone stale-verging-on-rock-hard. When you start with top-drawer bread that’s no more than a day old, use good olive oil, and toast the bread with care, you have something that is far more than a garnish, let alone an afterthought. What you have is the underpinning for a meal.

What you have is crouton salad. This is nothing new: It’s basically a Tuscan panzanella with crisper bread. But it is a godsend when potatoes, rice, or pasta don’t appeal, all you see in the vegetable crisper is half a bunch of kale or a handful of parsley, or if you are feeding someone who feels that he never gets quite enough croutons in a classic Caesar.

The salad you see above has been in rotation in our household for about a month now. It’s a spin on the famous kale salad at Lupa restaurant, still going strong down on Thompson Street. In place of the pine nuts, you could add snowy shards of ricotta salata or long curls of Parmigiano-Reggiano.

This evening, crouton salad with kale is going alongside salted-and-peppered chicken thighs, roasted until golden brown and very crisp on top. (They really are impossible to ruin.) Because my sweet Sam has been working outside all day, clearing away some of Sandy’s debris, he’ll be hungry and dog-tired. It seems only right, then, to fry up a few thick strips of bacon or a thin slice of country ham and add that to the mix. By the time Sam takes off his boots and washes up, our home will smell wonderful. “Are you ready?” I ask. “No need to rush. I’ll make you a plate.”

WEATHERING THE STORM

This just in, a postcard from our true-blue friend Robert Clepper (and the ever-delightful Wanda, his Jack Russell terrier).

“Dear Jane and Sam,

Hope that you are well, warm and fed.

Sorry for the adversity.

You remain in our prayers and hearts.

Love, Robt. & Wanda”

Take it from someone who knows: Robert hails from New Orleans and Galveston, Texas, and has survived a number of hurricanes in his life, including Katrina, Rita, and Ike. In comparison, we are off-the-charts fortunate.

Still, life is at sixes and sevens after hosting the in-laws, whose life on Long Island was complicated by the power outage caused by Hurricane Sandy, for seven days in our one-bedroom apartment (I know, I know); interminable lines at supermarkets, bus stops, gas pumps, and polling places; and a greatly disrupted work schedule.

In fact, it’s hard to think straight at the moment, with election results as well as a post-Sandy nor’easter looming large.

So all I have to say is, cook with love for the people you love. If you are in a position to manage it, cook for those who still are without heat, water, or a home.

If it’s impractical to give time, give treasure. Below are some agencies who are among those accepting contributions to assist people affected by Hurricane Sandy. I also recommend checking out Charity Navigator: Your Guide to Intelligent Giving.

American Red Cross

Brooklyn Recovery Fund

The Humane Society of the United States

Mayor’s Fund to Advance New York City

Salvation Army

United Jewish Federation of New York

United Way Sandy Recovery Fund


STORM COOKING: (MEATLESS) SOUP BEANS

It’s the day after Hurricane Sandy walloped New York, and Sam and I are among the fortunate—we are sitting high and dry, with the lights on. I’ve just sheathed the Maglites and the hand-crank weather radio (complete with cell-phone charger) in zip-top bags and stowed them back in the emergency box. Sam watched me without comment; after looking at the coverage of all the hell that broke loose last night, he’s no longer so quick to dismiss my near-obsession with disaster preparedness.

I came by it honestly. Hurricanes Hazel and Connie-and-Diane (hyphenated and always mentioned in the same breath because they hit North Carolina within five days of each other) wreaked their havoc a few years before I was born, but they remained fresh in the minds of my parents. By the time I was six or so, I was practiced at helping my mother update what she called her emergency larder, located on the top shelf of the pantry. At least once a year, we would make sure there were boxes of safety matches and spare wicks for the hurricane oil lamps; fresh jugs of distilled water; and containers of fresh flour, cornmeal, salt, and sugar tightly wrapped in multiple layers of plastic. Alongside the small pots of Vienna sausages and deviled ham, there was a supply of canned nonperishables, their contents marked on the top with an indelible marker, in case the paper labels got wet and disintegrated.

This stock-taking always took place before hurricane season, weeks before any coastal warning display flags appeared. I never knew what precipitated it; perhaps the sky was a little too bright, the ocean, a little too glittery. Anyhow, my mother, expert at sizing up things that were too good to be true, always wanted to be ready for anything.

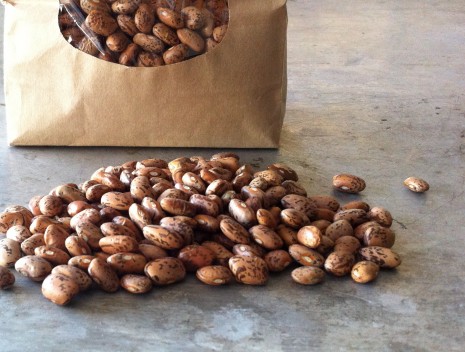
Her emergency rations included cans of Luck’s pinto beans, and for some reason, I found them especially fascinating—I guess because I don’t recall my mother ever cooking or serving pintos. She adored butter beans, snap beans, and all manner of fieldpeas—from delicate lady peas to earthier, almost mushroomy black-eyes—and that was what we ate. Looking back, I have no idea why pinto beans were among her inventory—they were likely on sale at the time. I just remember wishing for a hurricane to hurry along so I could try them. A big enough storm eventually obliged, and those canned pintos were just as delicious as I expected them to be. I’ve loved them ever since.

It’s impossible to imagine the cooking of Mexico and the American Southwest without pinto beans, but for me they are most closely identified with the cooking of Appalachia. All through the mountain South, in fact, pinto beans are what people mean when they refer to “soup beans,” served in their rich broth with hot cornbread and a slice of fresh onion on the side. The preferred seasoning meat when cooking soup beans is salt pork; those made with a ham hock taste, well, ham-handed in comparison.

In my neck of the woods, salt pork is difficult to come by, although when I once explained what I wanted to a young, earnest supermarket manager, he brightened immediately. “Like in salt pork and gravy?” he asked. “That’s so old-timey, like in the Little House on the Prairie books. I read those to my daughter! And, nope, we don’t carry it.”

That is why pinto beans fell out of my bean-cooking repertoire. Until, that is, Hurricane Sandy started to get serious and I found myself yearning for a taste out of that emergency larder … except better. Coincidentally, I discovered a recipe for meatless soup beans in Butter Beans to Blackberries: Recipes from the Southern Garden, by my great pal Ronni Lundy, self-styled writer, rocker, and cornbread fundamentalist. I thought I knew the book well, but like all classics, it rewards you with something new every time you pick it up.

Ronni credits Sheila Joyce Strunk for this recipe. Growing up near Berea, Kentucky, Sheila had always cooked her soup beans the traditional way. But when she and her husband got into the Louisville restaurant/club business, some of their customers requested a meatless version, and she gives hers roundness and depth of flavor with good olive oil, along with onion, garlic, thyme, and marjoram.

You can always soak your beans overnight beforehand, but this recipe uses a quick-soak method that works like a charm. No matter what, the freshest possible dried beans will deliver the best flavor and creamiest texture. I bought mine from Cayuga Pure Organics, at (where else?) the Union Square Greenmarket, but no worries—just buy your supply at a store that has a high turnover, and you’ll be fine.

So last night, we moved the dining table away from the windows, which had begun to flex in the sustained gusts powering down our street. I ladled soup beans into thick earthenware bowls and set them on wide plates, with room enough for a wedge of Ronni’s Real Cornbread, and we ate by candlelight.

We have plenty left, so we can easily feed a hot meal to friends who are coping with power outages and flooded basements. But maybe I should get another pot of soup beans working on the stove. It would be nice to have a batch in the freezer. Just in case.

Meatless Soup Beans

From Butter Beans to Blackberries by Ronni Lundy (North Point Press, 1999)

1 pound dried pinto beans

2 tablespoons olive oil

¼ cup chopped onion

½ tablespoon minced garlic

1 teaspoon crushed dried marjoram [I used 1 sprig of fresh marjoram]

1 teaspoon dried thyme  [I used 2 sprigs of fresh thyme]

1. Rinse the beans and pick through them, discarding any stones. Place the beans in a large, heavy soup pot and cover with water above 2 inches above the beans. On high heat, bring to a boil and boil, uncovered, for 10 minutes. Turn off the heat and let the beans soak for 1 hour.

2. Add more water to the pot, if necessary, to bring the level about an inch above the beans. Add the olive oil. Bring to a boil, cover, and turn the heat to medium-low. Simmer for 1 hour.

3. Add the onion. Continue to simmer for about 1 hour, or until the beans are soft and creamy inside. (Taste a bean to see.)

4. Remove about ½ cup of beans and mash them to a thick paste. Return them to the pot and stir to incorporate. Add the garlic, marjoram, and thyme. Add salt, starting with 1 teaspoon and increasing to your taste. Allow the beans to simmer over very low heat for another 20 minutes to let the salt seep in. Fish out the herb sprigs if you used them. Serve piping hot with Real Cornbread (see above) and white onion slices or a green onion on the side.


OBSESSION: THE WARREN PEAR

The pear is one of the world’s great dessert fruits. Native to the South Caucasus, North Persia, or the Middle East, it’s been cultivated for more than 4,000 years. Homer called it “the fruit of the gods,” and Grand Duke Cosimo II de’ Medici (best known as patron of Galileo Galilei, his childhood tutor), was said to have had 209 different varieties served at table.

Personally, I’m happy with just one: the Warren, a pear prodigy from the Deep South brought from obscurity to cult status by Al Courchesne, of Frog Hollow Farm, in the Sacramento River Delta.

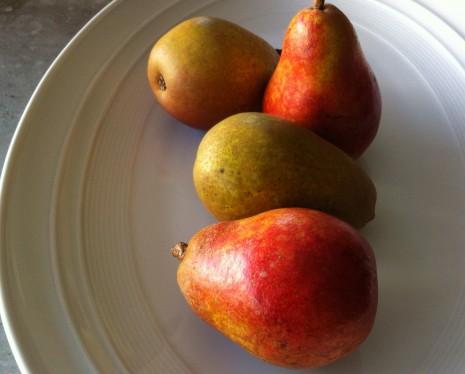
As you can see in the above photo, the Warren varies in shape and color. A cross between the Seckel and Comice cultivars, it exhibits the best traits of both parents: the rich, spicy sweetness of the Seckel, the wanton juiciness of the Comice, and the finely textured flesh of both. A fully ripened Warren isn’t gritty, like many varieties; instead, a minimum of characteristic grit cells (a.k.a. stone cells) results in a silky, tender consistency.

This pear was named for Thomas O. Warren, a founding father of the North American Fruit Explorers (NAFEX), who discovered it in Hattiesburg, Mississippi, circa 1976. The provenance of the cultivar is murky if not outright mysterious; fruit authority and former Gourmet contributing editor David Karp recounted the tale with great élan in the Los Angeles Times almost a year ago.

Now to practical matters. A pear is ripe when the skin around the neck, or stem end, gets a little wrinkly and yields to gentle pressure. It’s not a good idea to stack or cluster pears if you keep them at room temperature, and don’t let them become soft all over—that means they are overripe. Refrigerating ripe pears will slow down the process; I like to refrigerate them, stem side up, on a quarter sheet pan, loosely draped with a sheet of plastic wrap.

All you really need to serve with a perfectly ripe Warren—or any other dessert pear, for that matter—is a knife and fork, for quartering the fruit, cutting out the core, and, if desired, paring the skin before eating the wedges with your fingers. Still, there are times when you may feel compelled to gussy the fruit up a little. Its sweetness is marvelous in a first-course salad with arugula and perhaps toasted hazelnuts or walnuts (toss the pears with lemon juice or a little vinaigrette to prevent browning). Or, after dinner, roll dessert and a cheese course into one by serving a bowl of pears with a generous wedge of blue-veined Gorgonzola or Stilton, or an aged Pecorino Romano.

The fact that pears don’t have to be ripe when you cook with them means that they’re extremely user-friendly. A pear tart or galette is always celebratory, and a pear crumble or crisp will make the fanciest dinner guests feel like part of the family. Poached pears are nice because they can be done ahead; David Lebovitz has a marvelous tutorial right here.

One of my favorite ways to cook pears, though, is bake them and serve them with caramel sauce. I first had them that way at Chez Panisse, back in the (yikes!) mid-1980s. A year or so later, I bought Chez Panisse Desserts, by Lindsey Shere, the restaurant’s co-founder and pastry chef, on the strength of that recipe alone. Both it and the book continue to inspire.

Warren pears are pretty much impossible to find outside of Frog Hollow Farm. Organic, sustainably farmed, and delicious, they are well worth the money, but if you are curious about other varieties, check out my thumbnail guide to pears from last year.

Lindsey Shere’s Baked Caramel Pears

Adapted from Chez Panisse Desserts 

Serves 6

The tidiest, least wasteful way to core a pear is with a melon-baller.

3 large firm-ripe pears, Comice [or Warren] if available, peeled, halved, and cored

3 tablespoons unsalted butter, cut into small pieces

3 tablespoons sugar

½ cup heavy cream

Preheat the oven to 375º. Arrange the pears, rounded sides down, in an ovenproof skillet. Distribute the butter over the pears, then sprinkle the sugar over them. Bake 15 minutes. Tilt the skillet and baste each pear with the liquid in the pan. Bake until pears are tender when pierced with a paring knife, about 10 minutes more. Transfer the pears to a plate and set the skillet on the stovetop over medium-high heat, stirring constantly until the sauce turns a light caramel color. It will look thick and bubbly. Carefully pour in the cream [it may splatter] and bring to a boil. Cook just until the sauce is smooth and turns a rich caramel-brown. Immediately remove from the heat. Place a pear half on each of 6 plates and spoon some of the sauce over each. Serve warm.

SWING-SEASON POLENTA: A MARKET STORY

I am eating my way through October with gusto and greed. It’s the year’s great swing season, after all. The days are still warm and long enough to allow the last of the tomatoes, eggplant, green beans, and corn to sweeten and mature. Short-season cool-weather crops of lettuces and radishes—tender and juicy—are being harvested.

And all jostle for space at the farmers market with winter squashes, which range in color from the deep orange of a Red Kuri (a relatively new Japanese kabocha type) to the Chanel beige of a butternut. The root vegetables—sweet potatoes, parsnips, and carrots—that have been growing underground for months are just dug and still smell of damp earth, and the kales, collards, and other pot greens look robust and succulent.

The other day at Union Square, I found myself standing meditatively in front of a bin of chard grown by Keith Stewart. Chard (a.k.a. Swiss chard) is not my favorite green—it can taste a little muddy to me unless doctored up. But with mild, crunchy stems and leaves that turn almost as silken as those of beets (a close cousin), it counts as a “two-fer” vegetable in my book. And besides, both the white- and golden-stalked varieties on sale were drop-dead gorgeous.

Most importantly, though, they put me in mind of an autumn week I once spent cooking with the masterful Georgeanne Brennan in the south of France. Chard is the staple green in that part of the world—you’ll even find it served for dessert, with honey, pine nuts, or apples, in a tourte de blettes. I remember Georgeanne telling me about the cheese-rich polenta she makes, topped with sautéed garlic, sweet peppers, chard, and any other odds and ends she found in her garden. It sounded delicious at the time, but I’d never gotten around to trying my hand at it. I have no idea why, because it is extremely simple to make and and lends itself to improvisation.

You’ll see part of my haul from the farmers market above. The Red Kuri squash, at right, is one of two I picked up. I cut both in half and roasted them that evening; we had one squash for supper with pork sausages, and I tucked the other in the fridge for later on in the week, which is now.

If I didn’t have the squash on hand and ready to go, I would probably add a tomato. And as luck would have it, I discovered part of a head of escarole in the vegetable crisper. Its slight bitterness is very nice with the chard, although minerally spinach would be good, too; the combination of chard and spinach is a very old one.

As far as the polenta goes, any type except quick-cooking will do. Coincidentally, my stash comes from another Georgeanne, “The Original Grit Girl” Georgeanne Ross, of Oxford, Mississippi, who grinds polenta (as well as cornmeal, grits, and masa) to order. It has a deep, sweet, pure corn flavor that is just soulful—there is no other word for it.

Polenta takes a good 45 minutes to cook, which may seem daunting on a weeknight, but it is a surefire way to decompress. Polenta won’t be rushed, and as the corn slowly absorbs the water, you have plenty of time to pour a glass of wine, turn on some music or NPR, and prep the greens and whatever else you are using. It’s a satisfying way to end the day.

Swing-Season Polenta

Adapted from Georgeanne Brennan

This recipe makes plenty of polenta. It sets up as it cools, so spoon the leftovers into a broilerproof baking dish and refrigerate. When ready to use, sprinkle with grated Parm, bake until heated through, then broil until the top is lightly browned, or simply cut the chilled polenta into squares and panfry. Drizzle with tomato sauce, and you have another meal.

polenta

6 cups water

coarse salt and freshly ground pepper

1½ cups polenta (not quick-cooking)

2 tablespoons unsalted butter

a generous handful of finely grated Parmigiano-Reggiano

vegetables

2 garlic cloves

1 small onion

1 bunch chard, washed, dried, and stems removed

½ head escarole or other bitter green (dandelion, chicory) or 1 bunch spinach, trimmed

2 to 3 sweet Italian frying peppers (shown above) or 1 bell pepper (any color but green)

leftover roasted winter squash or 1 ripe tomato, if desired

extra-virgin olive oil

coarse salt

1. Get the polenta working: Bring the water, seasoned with salt, to a boil in a heavy pot. Add the polenta in a thin, steady trickle, stirring with a wooden spoon, and cook over moderate heat a couple of minutes. Reduce the heat and cook the polenta at a bare simmer, stirring frequently, until it’s very thick, smooth, and pulls away from the side of the pot while being stirred, about 45 minutes.

2. Meanwhile, chop the garlic, onion, and chard stems. Roughly chop the greens. Halve the peppers lengthwise and discard the seeds and ribs. Cut their flesh lengthwise into thin strips. Cut the leftover squash or tomato into small chunks, if using.

3. About 10 minutes before the polenta is ready, heat a nice glug of oil in a large skillet over moderately high heat. Add the garlic and onion and let them get along for a minute or two. Add the chard stems and peppers. Sauté for a few minutes, then add the greens. Season with salt, reduce the heat, and cover the pot. Cook until the greens are wilted and verging on tender, about 5 minutes. Add the roasted squash or tomato and cook until warmed through. Stir gently to combine.

4. When the polenta is done, remove it from the heat and stir in the butter, then the cheese. Season with salt and pepper. Spread the polenta in a warmed shallow serving bowl and top it with the sautéed vegetables.


NEW YORK STATE SORGHUM: A MARKET STORY

About six years ago, I’d heard that a couple of farmers, two brothers, from the Catskills region had started making sorghum syrup, a tangy, deep-flavored sweetener better known south of the Mason-Dixon Line. I filed the information away, then forgot about it; I always seem to have a jar of the stuff, lugged back from a visit to Mississippi or Georgia, sitting in the refrigerator.

Last week, I noticed our supply was getting low, real low. I generally take this as a sign it’s time to make travel plans, but not this year—I’m juggling way too much. I wrote myself a note to order some, and that’s as far as I got. And then, by the happiest of coincidences, I met Tony VanGlad, one of those sorghum-makers, at the Union Square market on Saturday, subbing for his brother, who usually sells just their Wood Homestead maple syrup there. Tony sells both maple and sorghum syrups at the Tucker Square market*, on the Upper West Side, and had a few jars of the latter front and center. “I think we’re the only business growing sorghum up North,” he said. He made my weekend.

Now, about sorghum. The plant (Sorghum bicolor) is a tall canelike grass topped by a heavy tassel of seeds. Grain sorghum is a staple in the arid tropics; its threshed grain is ground into flour and the stalks are used for livestock feed. The succulent stalks of another type, sweet sorghum, contain as much as ten percent sucrose; during harvesting, the juice is squeezed out of the plant and cooked down into thick syrup** the color of mahogany and rich with antioxidants, potassium and other nutrients. For the past month, in pockets of north Georgia, North Carolina, Tennessee, Mississippi, Alabama, and as far west as Indiana, sorghum is being harvested and celebrated in festivals. It’s a culinary icon of the American South. Of course, just like many other foods that wear this label—okra, peanuts, and black-eyed peas, for instance—sorghum is from Africa.

Cultivated for more than 5,000 years, sorghum is, in fact, perhaps the oldest grain in Africa, and, along with millet, one of the planet’s most drought-resistant. In In the Shadow of Slavery: Africa’s Botanical Legacy in the Atlantic World, Judith A. Carney, a professor of geography at the University of California, Los Angeles, describes sorghum as a surpassing botanical marvel. “It can be planted in both temperate and tropical zones, with or without much rainfall,” she explains. “It grows in infertile soils, tolerates salinity, and produces a cereal that minimally taxes soil nutrients.”

 In colonial days, you would have found sorghum cultivated in America and the Caribbean for animal fodder and grown in slave food fields. Some centuries on, it’s largely grown for forage in the U.S., although some have started calling it a next-generation biofuel.

The VanGlad farm has taken another direction. The family is already growing barley and hops for the younger generation’s hyper-local Tundra Brewery, which includes Ma-Pale Ale (made with the farm’s maple syrup) and, come late fall, a gluten-free beer, made with freshly harvested sorghum. And they’re selling 55-gallon drums of sorghum syrup to a Catskills craft distillery, KyMar Farm, that’s making triple-distilled Schoharie Shine. With the barest flicker of a wink, Tony said, “They’re the first ‘licensed’ distillery in the county since Prohibition.”

One of these days, I’ll have to get my hands on some, but until then, I’m more than happy with Tony’s sorghum syrup. I’ll swirl some into barbecue sauce or or a marinade, or deglaze a pan with sorghum and a hit of bourbon and drizzle that over pork chops or a steak. It is delicious straight, on vanilla ice cream, cornbread, pancakes, waffles, or oatmeal. Buttermilk biscuits, too, obviously, although if you really want to put on the dog, serve them with the sorghum butter below.

Sorghum Butter

When buying sorghum syrup, be aware that some brands are cut with corn syrup. Make sure the label reads “100% sorghum.”

1 stick unsalted butter, softened

¼ cup 100% sorghum syrup

Stir together butter and sorghum until combined well and refrigerate for up to a week. Bring it to room temperature before serving.

* The VanGlads’ Blenheim Hill sorghum syrup (along with their Wood Homestead maple syrup) is available on Saturdays at the Tucker Square Greenmarket (Columbus Ave. at 66th St.) or directly from the farm (866-337-9787).

** The syrup is the principal product of sweet sorghum, unlike darker, more assertive molasses, which is a byproduct of refined-sugar manufacturing.

KITCHEN ALCHEMY: SLOW-ROASTED TOMATOES

I wish you were here, because our apartment smells wonderful. It’s the tomatoes I’m roasting; after five hours in a low oven, they are well on their way to a mellow, deep-flavored sweetness. In another hour, their texture will be meaty, lush, and a little chewy around the caramelized edges. Magical.

Slow-roasting is more of a process than a technique. As far as I’m concerned, it also justifies the existence of plum (Roma) tomatoes. I don’t often use them for tomato sauce—I like the more-interesting balance of fruitiness and acidity you get from a mix of heirloom varieties—and I don’t much care for them raw. But when they are roasted, they have great integrity: They hold their shape well, shriveling rather than turning to mush. The slow evaporation of juices really intensifies their flavor, too. I like them better than sun-dried tomatoes, which can be tough and on the salty side.

This afternoon’s activity was dictated by my most recent market haul. In early October, the variety and sheer abundance of produce at Union Square is staggering. Fall’s heavy hitters like pumpkins and winter squashes mix it up with the last of summer’s glory, and, not for the first time, I reflect on the fact that here in the middle of New York City, home cooks are spoiled rotten.

Long story short, I bought pounds and pounds of tomatoes. Greedy, I know, but how could I not? Because of the shorter days (i.e., fewer hours of sunlight), the Sungold cherry tomatoes finally had enough acid to balance their candylike sweetness, and they are at their peak. Sam and I eat them by the handful, for dessert. Farmers are selling their green tomatoes—they’ll never ripen on the vine—and tomorrow night, I’ll fry them up for supper. It doesn’t matter what else is on the table. And the heirlooms are still going strong. We have enough for plenty of salads, and for cooking with the very last of the okra in ratatooey.

And the plum tomatoes, which I’ve ignored all season, spoke to me at last. I know that if I roast them for a good eight hours, their flavor will be concentrated enough to stand up to pasta. But I reckon I’ll pull these out of the oven at around six hours. At that point, their flesh will be silken—perfect for spreading on bruschetta—that is, thin slices of baguette, smeared with olive oil and toasted. That is how they appear in The Gourmet Cookbook, and in looking at the recipe, I was reminded of Zanne Stewart, the former executive food editor at the magazine. It was her recipe, I thought, so I dashed off an email.

“I think so,” she wrote back, “although I realized I haven’t made them for several years. But I did this August and I have two changes. I lined the pans with parchment paper, for one. Second, I puréed half the tomatoes through the food mill and froze that as a base for Marcella’s outstanding onion and butter sauce later this winter.”

“Why the parchment?” I asked.

“I didn’t want nekkid tomatoes on my beloved Doughmaker pans making stains,” Zanne replied. The pans I used for my tomatoes are beyond hope, so no worries there, but I pulled out a Doughmaker, with its pebbled surface (see below photo), to toast the baguette slices. And I love the idea of turning some of my roasted beauties into what is perhaps Marcella Hazan’s greatest gift to the culinary world (backtrack to that tomato sauce link, above, and scroll down). I’ll need lots more tomatoes.

Slow-Roasted Tomatoes

From The Gourmet Cookbook (Houghton-Mifflin, 2004)

4 pounds plum tomatoes (25 to 30)

6 garlic cloves, minced

5 tablespoons extra-virgin olive oil

Coarse salt and freshly ground pepper

1. Position racks in upper and lower thirds of oven and preheat oven to 200º. Meanwhile, halve the tomatoes lengthwise and put, cut sides, up, on two large rimmed baking sheets. Stir together the garlic and olive oil and spoon over tomatoes. Sprinkle tomatoes with about 1 teaspoon salt (total) and season with pepper.

2. Roast the tomatoes, switching position of baking sheets halfway through, for at 6 hours and up to 8 (longer roasting will intensify the flavor). Roasted tomatoes can be refrigerated in an airtight container for up to 2 weeks. Bring to room temperature before serving.